
A Practical Process for Testing Tile Samples at Home
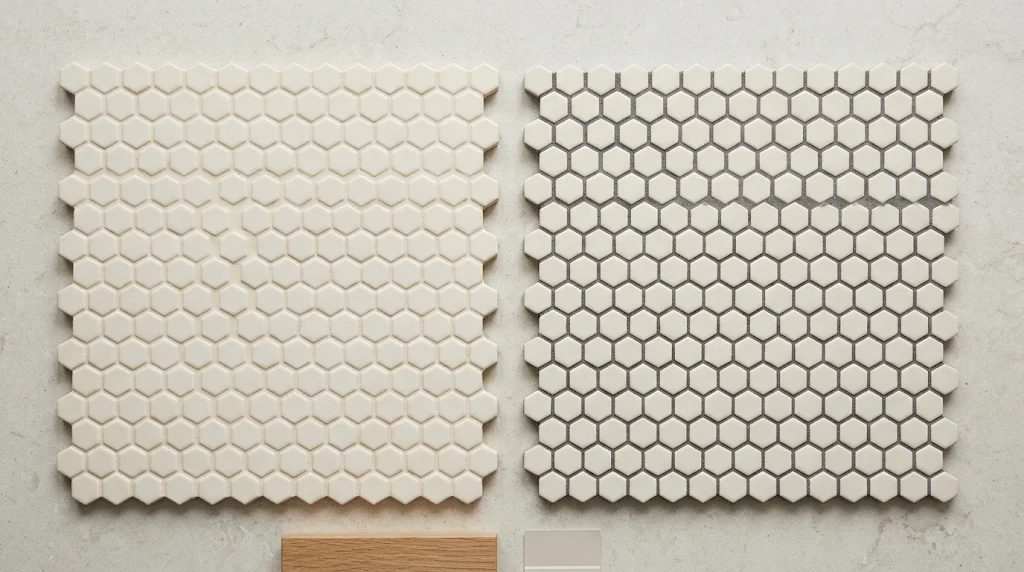
Green that appears lively under showroom lamps often settles into slate once it meets warm bathroom paint. Grout has the same capacity for surprise; a swatch chosen in isolation can turn a delicate motif into a rigid cage. Neither transformation is visible in a catalogue shot. You need the piece in the room it will actually serve.
Colour behaves differently across surfaces, and the surrounding finishes have as much say as the piece itself. Working with several shortlisted samples of mosaic tiles keeps the comparison grounded in your own conditions.
Once one candidate leads, order a full sheet and follow the design across its width. A small chip can eliminate a colour outright, yet only a sheet reveals the cadence you would live with daily. Keep your intended grout beside the candidates throughout the process.
Requesting a sample that shows the whole repeat
Find out what will actually arrive before you accept the delivery. A listing may photograph a complete sheet while the sample itself consists of fragments cut from it. That is enough to compare two tones of a plain square. For basketweave, multi-colour blends or designs built from several shapes, ask for a full sheet or one complete repeat.
If the design survives that stage, ask whether you can buy two sheets rather than one. The second sheet answers a different question, because it reveals what happens where the first run ends. Interlocking layouts depend on pieces crossing the seam, so a balanced single sheet may still produce a conspicuous line when several meet. Study that junction before the main order goes in.
State the installation location when you order from the tile shop. A shower floor requires a design approved for wet, barefoot service rather than a visual resemblance alone. Supplying that detail ensures the specification sheet matches the product you have selected. Collections often hold several variants with different permitted uses, so settle the application question before colour testing begins.
Placing the sample in its future position
Wall samples stand upright; floor samples lie flat. The distinction sounds obvious, yet comparisons arranged on a kitchen table routinely mislead, because installed surfaces meet light from different angles. Rest a splashback piece against the wall just above the worktop, exactly where it will sit in daily use. Inside a shower niche, hold the sheet at recess height and notice the shadow thrown by the shelf overhead.
Examine the sample in daylight, then again under the lamps you switch on each evening. If new fittings are part of the renovation, repeat the exercise once bulbs and fixtures are finally chosen. Glossy mosaic tiles beneath a spotlight throw bright reflections that barely register in morning sun. Matt finishes tend to expose small shade differences more readily under the same source.
Now retreat from the wall. A shower panel viewed from the doorway presents a different picture than the same panel seen from inside the enclosure, so cover both. An open-plan kitchen contributes a third vantage point from the dining table. Up close you assess cut and surface; from a distance you assess how much of the room the pattern claims.
Do not rush the verdict. Tape the sheet where it belongs and revisit it the following morning; first impressions and settled impressions are not always the same.
Setting the sheet against neighbouring materials
Lay the sheet flat against the worktop, vanity, paint or field tile that will border it. A cool white reads as neutral in isolation and decidedly blue beside a cream surface. Within a mixed palette, notice which pieces pull the eye at the boundary, because dark units may jump forward beside pale cabinetry in a way they never did on display. Note the effect while everything is still stacked together.
Judge each pairing in the position where you will actually see it. If the sheet wraps a corner, sight it along both walls, because one may sit under a window while the other remains shaded by cabinets. In a bathroom, set the floor piece and the shower piece side by side at the threshold, where undertone differences surface fastest. Repeat the check at the hour you use the room most often.
When a combination still feels unsettled, describe the situation to the tile shop and ask which neighbouring finishes are usually installed beside that sheet. You need not follow the advice, but it gives your own comparison a useful starting frame. Carry a photograph of the wall colours so staff can picture your scheme during the discussion. Return with one focused question rather than a scatter of impressions.
Stale offcuts mislead as readily as poor photographs. Keep paint chips and worktop samples with the piece so every later comparison starts from current materials.
Judging the effect of the joint colour
Grout claims a visible share of any tiled surface because it threads between so many small pieces. With ivory squares, an ivory mix lets the field read as one continuous plane, while a darker mix outlines every unit. On a hexagon or scallop, that outline may be precisely the detail you want on show. The joint colour decides whether the pattern whispers or shouts.
This is where samples of mosaic tiles earn their keep. Hold two or three grout swatches against the sheet and shift each one around on a patterned design; a mid-grey that sinks into the darker pieces may make the pale ones pop. Photograph each pairing from the same spot if you need to compare later under steady light. The final call belongs in the room, with everything resting in place.
For a large or prominent area, ask your installer to assemble a small grouted board from spare pieces of the chosen sheet. Consult the tile shop about the typical joint width for that format before the board is made. Use the intended grout and judge the sample once it has cured as the product instructions require. On a textured face, the board also gives you a surface to trial the recommended cleaning method.
You will learn quickly how much routine wiping the joints demand. That practical test carries more weight than any description on a data sheet.
Inspecting where sheets meet and stop
Lay two sheets on a flat surface, keeping the gap between them equal to the gap between pieces inside each sheet. Step back and search for a visible line across the pair. In a blended design you may catch a cluster of dark pieces at one edge reappearing at the next. In a geometric design the join may sever a diagonal that looked smooth across a single run.
Show your installer what you notice before any fixing begins, because moving the starting point changes which pieces stay whole where they are most visible. A tiled panel behind a vanity meets the pattern at two different points, while a niche adds corners and a shelf to negotiate. If one particular shape drew you in, ask for the cuts to be marked on a dry layout first. Placement adjustments are far easier to make on paper than after adhesive sets.
Confirm with the tile shop whether sheets from the same run are available together, so layout advice arrives while options remain open. Agree a starting orientation and record it, so the installer begins from the same point on every wall. Ask whether a border is needed to finish a run cleanly; settling that early avoids a rushed decision later. Keep the note with the batch records for any follow-on work.
Verifying the batch before you order
Retain the sample label, or photograph it before it is discarded. When you order, quote the product code and finish alongside the colour name rather than trusting memory. If the manufacturer publishes a shade-variation rating, read it and ask to see several sheets together. Fired ceramic and natural materials vary, so the stock delivered may not match the piece you carried home.
Ask whether you can inspect a sheet from the stock that will actually ship. Confirm how many lots the supplier holds, and ask to see mosaic tiles drawn from the same production run. If boxes carry a shade or lot code, check whether the order can be filled from a single lot. Have your installer calculate the quantity with cuts, pattern alignment and spare pieces in mind.
Order those spares with the original batch to improve the odds of a close match for any future repair. When delivery arrives, compare sheets from several boxes against the approved sample before installation begins. Check them under the room's lighting and lay a few together to see the full range. Set the approved grout sample alongside for the last check, because that pairing is what you will live with daily.

 English
 Arabic
 French
 Spanish
 Portuguese
 Deutsch
 Turkish
 Dutch
 Italiano
 Russian
 Portuguese (Brazil)
 Greek
